This post contains affiliate links. Learn more here.

It seems like no #vanbuild is complete without a fan, and the MaxxAir fans are no doubt the most popular choice. I reached a point in my build where I wanted to start insulating the ceiling and installing tongue and groove planks, so I made it a priority to get the fan installed enabling me to build the rest of the ceiling around it.
I debated where I wanted to install the fan for quite a while. Having it in the back of the van, over the bed for maximum air flow at night seemed like a good option, but ultimately I decided to put it as far forward as I could. In that location, it will offer good ventilation above the cooking area and the pop-up indoor shower I plan to build later. I eventually plan on managing the climate in the back of the van with a 12V AC unit.
Before you begin chopping up your roof to install a fan, check the weather! Ideally there would be no precipitation in the forecast for a few days, the adhesive used to mount the adapter to the roof needs to cure over night before the fan can be installed to it – leaving a period of time with an open hole in your roof.
Tools & Materials You’ll Need
Fan Essentials:
- MaxxAir MaxxFan Deluxe 7500K
- DIYvan Roof Adapter
- Butyl Tape (inc with adapter above)
- DIYvan Inside Support Strips (optional)
- Dicor Lap Sealant
- 3M Window Weld
Tools & Materials:
- Drill & Impact Driver
- Drill & Driver Bit Set
- Step Drill Bits
- Blue Painters Tape
- Trigger Clamps
- Electric Metal Shear
- Sandpaper
- Isopropyl Alcohol
- Automotive Primer
Electrical Hookup:
- 14/2 AWG Marine Duplex Wire
- Heat Shrink Wire Connectors
- Crimping Tool For Heat Shrink Connectors
- Heat Gun
- Electrical Tape
- Push Mount Cable Zip Tie
- Sticky Mount Zip Tie
Optional Accessories:
Steps
- Step 1: Trace Cut Lines Onto Roof
- Step 2: Cut Fan Opening
- Step 3: Install DIYvan Roof Adapter
- Step 4: Install Fan
- Step 5: Wire Fan
- Step 6: Install Custom Trim
Step 1: Trace Cut Lines Onto Roof
The DIYvan Vent Adapter is a must for this project! I installed my fan in what they refer to as the “most forward” location, which requires a different adapter than fan installs elsewhere on the roof, due to the extra bumps and curves in that location. They make adapters for several vehicles including Transits, Sprinters, Promasters and others. Visit diyvan.com to view all of their products.
The adapter should line up with the grooves in the roof, so getting it into the correct location is pretty straight forward. I used a drill with a small drill bit to punch tiny holes through the roof in each of the the four inside corners to mark the area that needs to be removed.
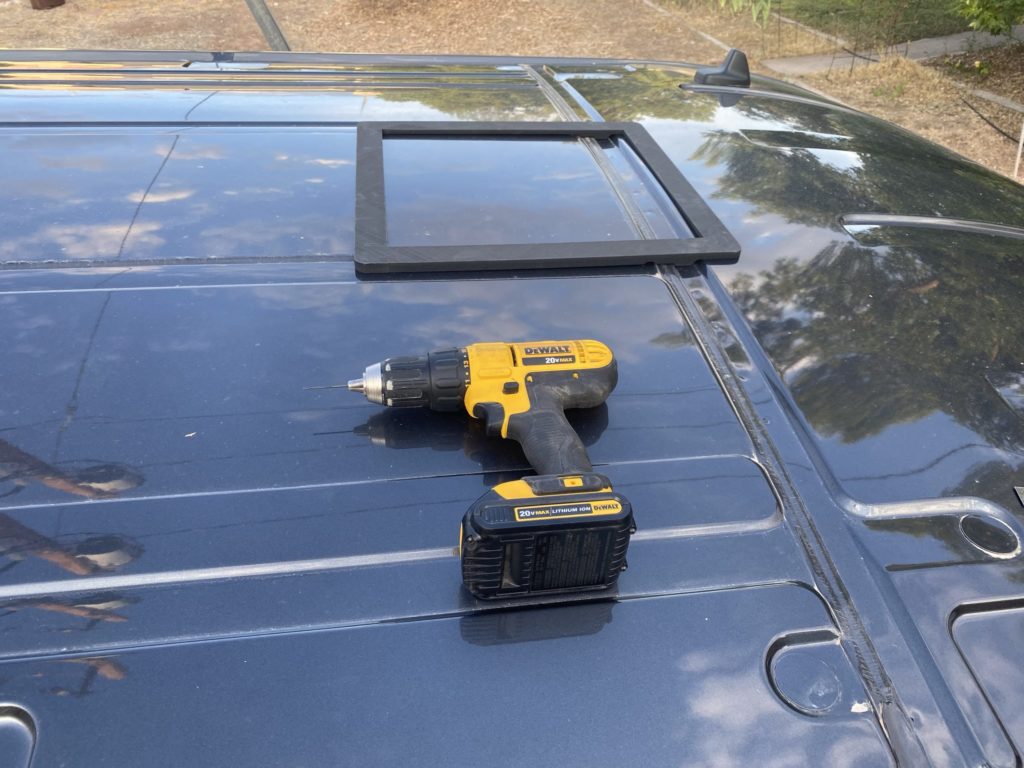
Once I verified that the locations of the holes inside the van were where I expected them to be, and that the cutout was going to be in the correct location, I connected the dots with blue painters tape and used a straight edge to trace a line over the tape between them. In hindsight, I could have laid down the tape first, and just traced the inside of the fan adapter onto it. What ever method you choose, mark up the exact line you intend to cut out.
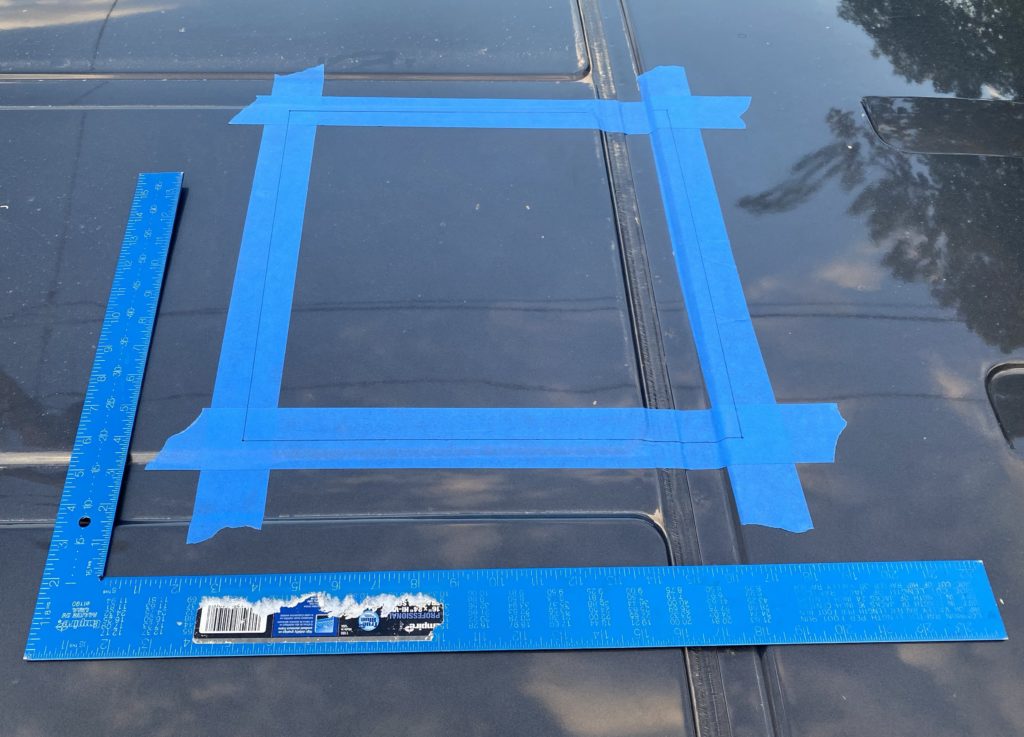
When I installed my slider door window, I used electric metal shears to make the cut and was very pleased with how well they slice through the metal without sending a ton of metal shavings flying everywhere, so of course I went with the same tool to cut a hole in my roof.
The blade of my electric metal shears require about 1/2″-3/4″ hole to fit into, so I used a drill and step drill bit to put a starter hole in each corner. I would probably recommend putting them in the center of each of the sides instead. The corners ended up a bit rounded and messy, cutting from the center outward would probably make for nice clean square corners.
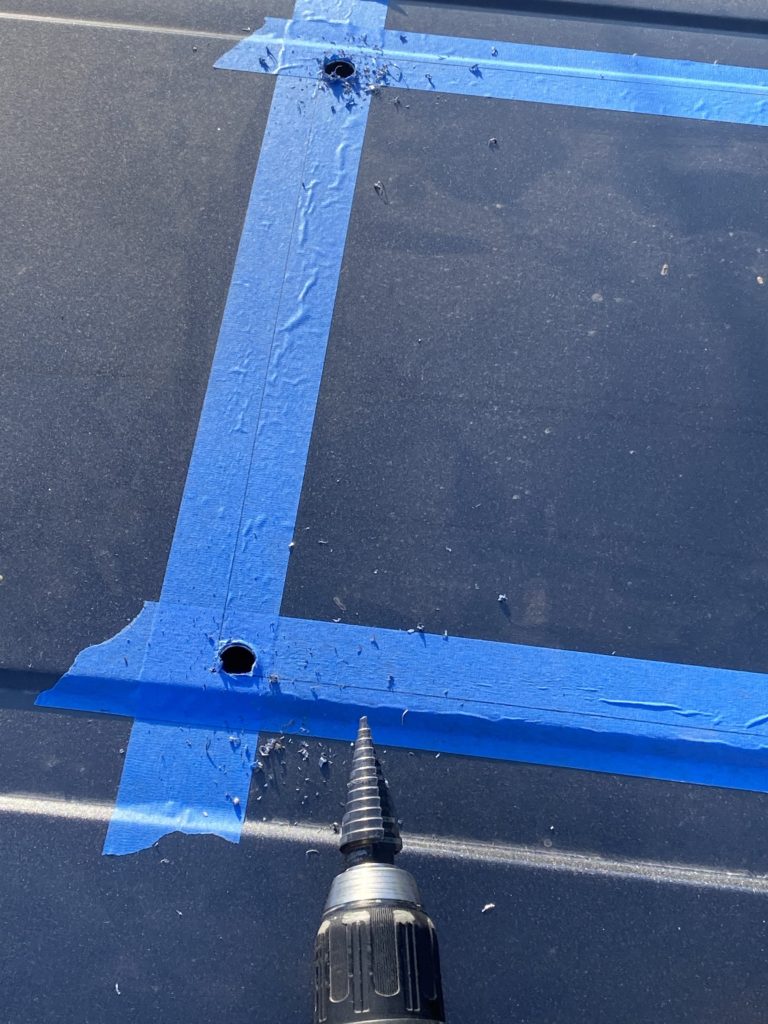
This is the point of no return… you have a few small holes in your roof, and the next step is to make a much larger hole… 14″ x 14″ to be exact. Are you ready?
Step 2: Cut Fan Opening
Once the starter holes are drilled, zip the metal shears along the cut lines between them. There is a seam in this “most forward” location where two layers of body metal are joined, and the shears had a tough time getting through both, but they made it with a little convincing and muscle.
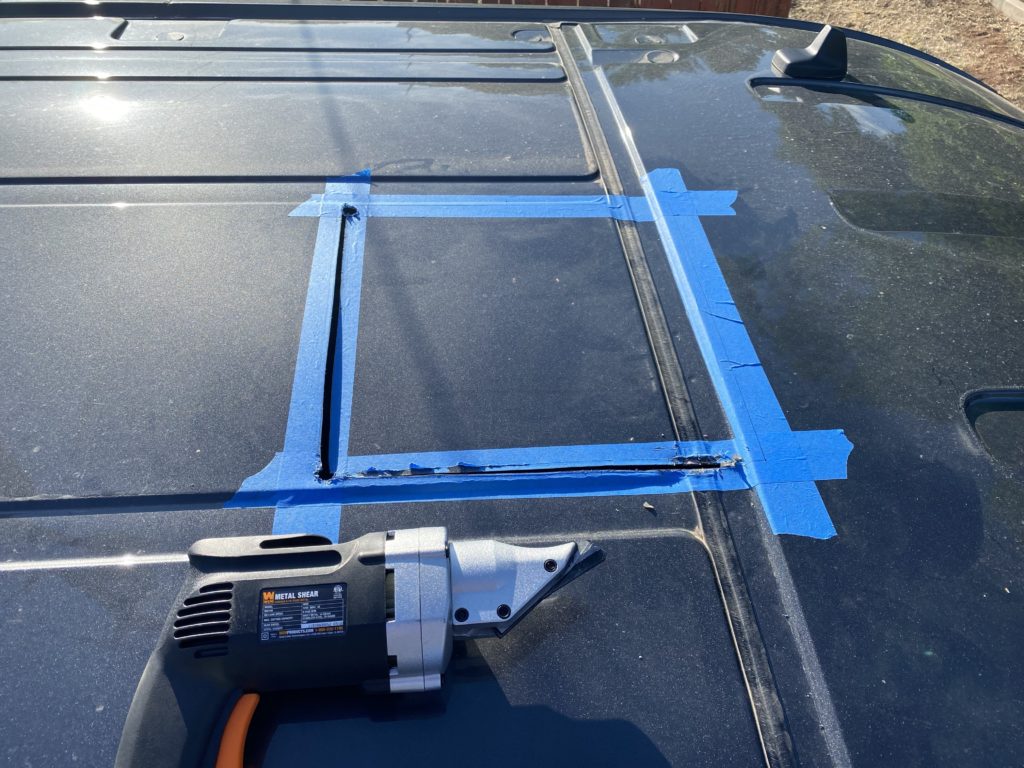
Wanna see the electric metal shears in action?
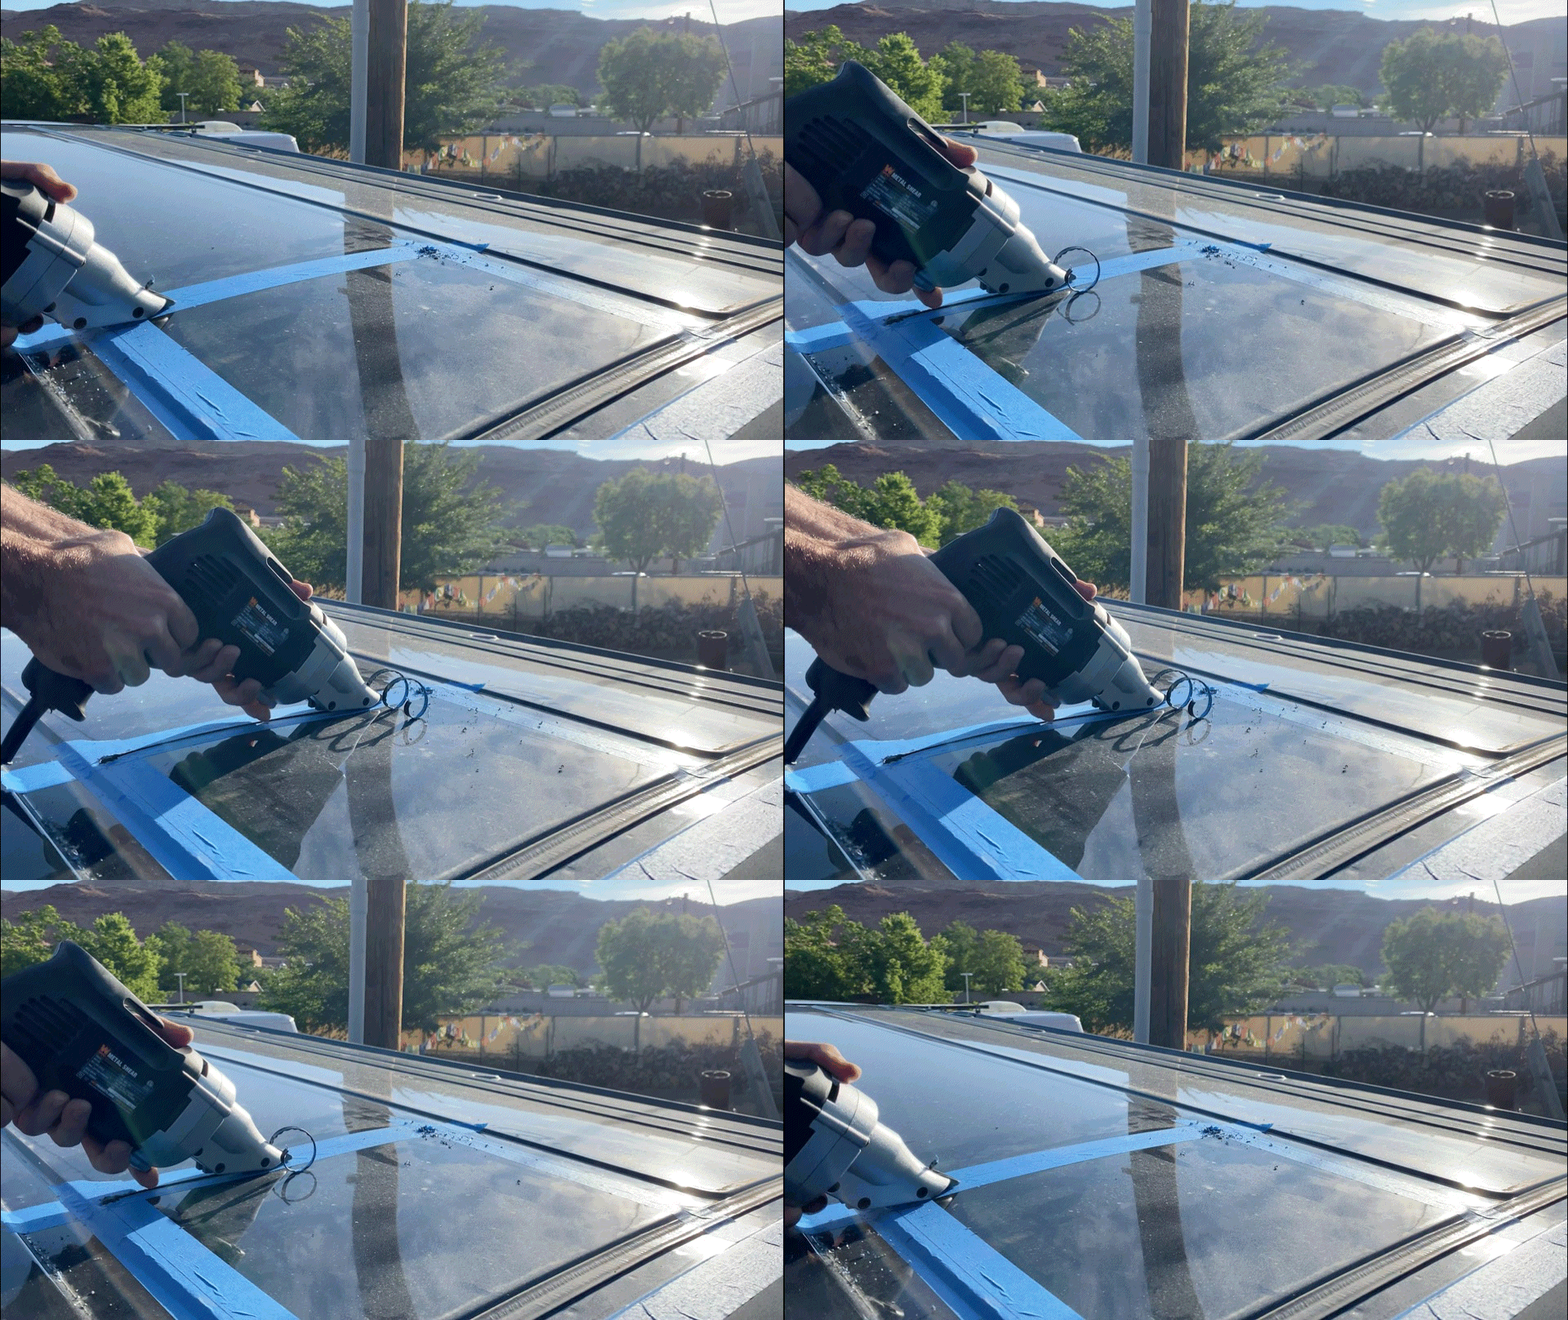
Notice the 1/4″ ribbon of metal that curls up as its extracted. Also notice the metal shards from drilling the corner holes that I should have cleaned up before sending them bouncing around the roof. Its a good idea to tape each side after you cut it to provide some support while you cut the rest, mainly to prevent the whole thing from falling into the van once you make the final cut.
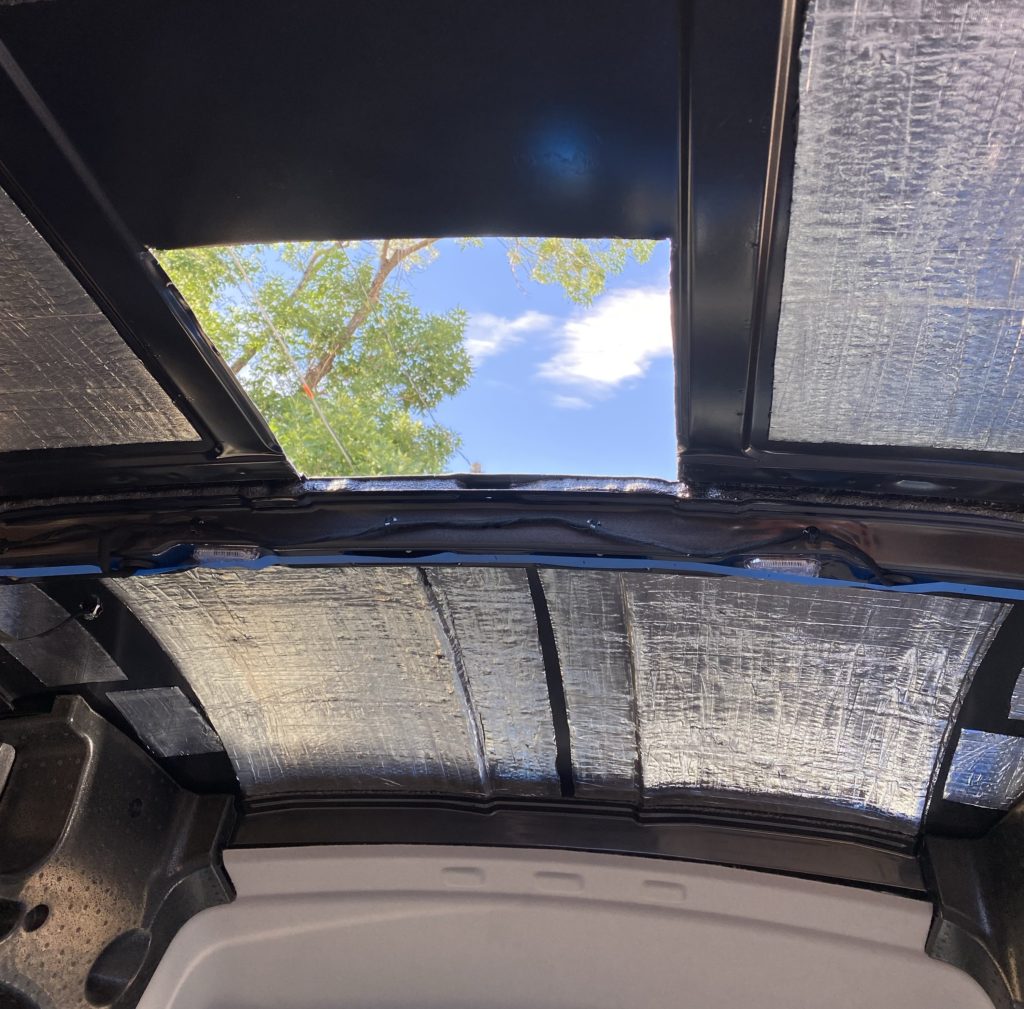
If there are any sharp or rough edges, knock them down with a metal file or something similar and make sure to apply an automotive primer along the cut edges to prevent rust! With the roof fully prepped, we can move onto installing the fan adapter.
Step 3: Install DIYvan Roof Adapter
Trying to install a fan on a curved roof with all sorts of bumps and grooves is asking for trouble… like a flooded van interior the first time it rains if you don’t manage to adequately seal all the way around the fan flange. The DIYvan Roof Adapter matches the contours of the roof and gives you a flat surface to mate the fan with. I highly recommend you order one of these from diyvan.com!
In order to ensure a strong adhesive bond between the van metal and roof adapter, its a good idea to lightly scuff up the paint where the adapter will sit. Set the adapter in place and then use blue painters tape to box it out leaving about 1/4″ spacing all around.
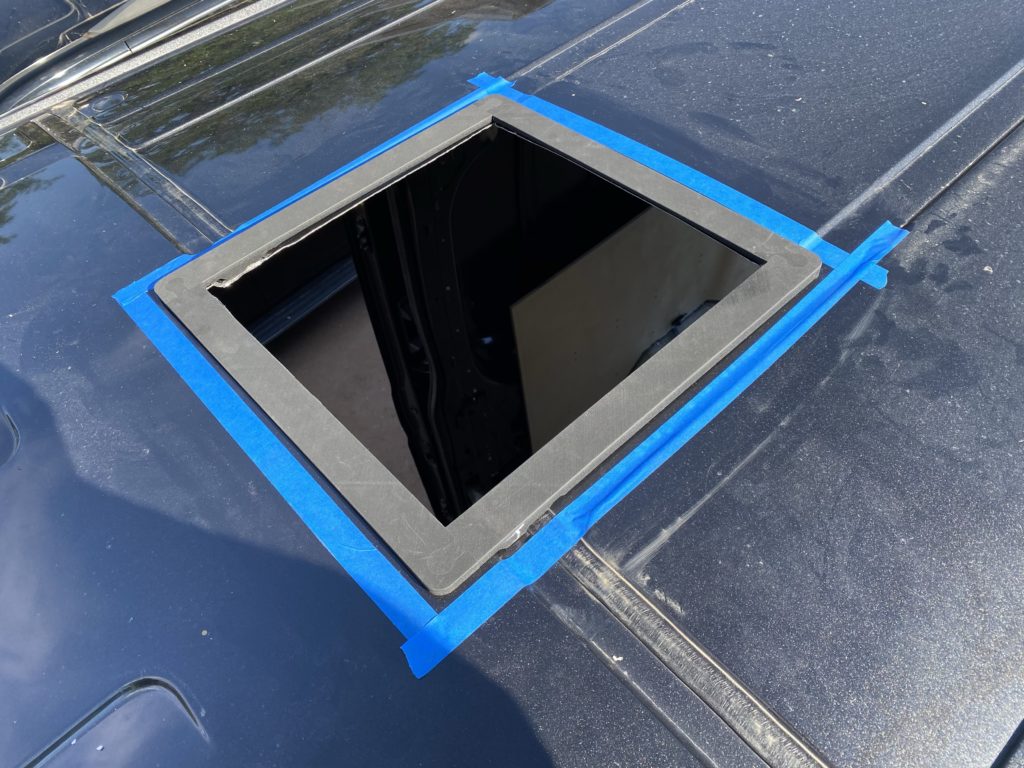
Once the area that needs to be scuffed is masked off, set the adapter aside and use sand paper, brillo pad or something similar to lightly de-gloss the area. You don’t want to rip through the paint, just dull the top coat slightly… roughen it up some so the adhesive has more surface area to bond to. Once you feel complete sanding the roof, remove the tape and then clean the surface with isopropyl alcohol.
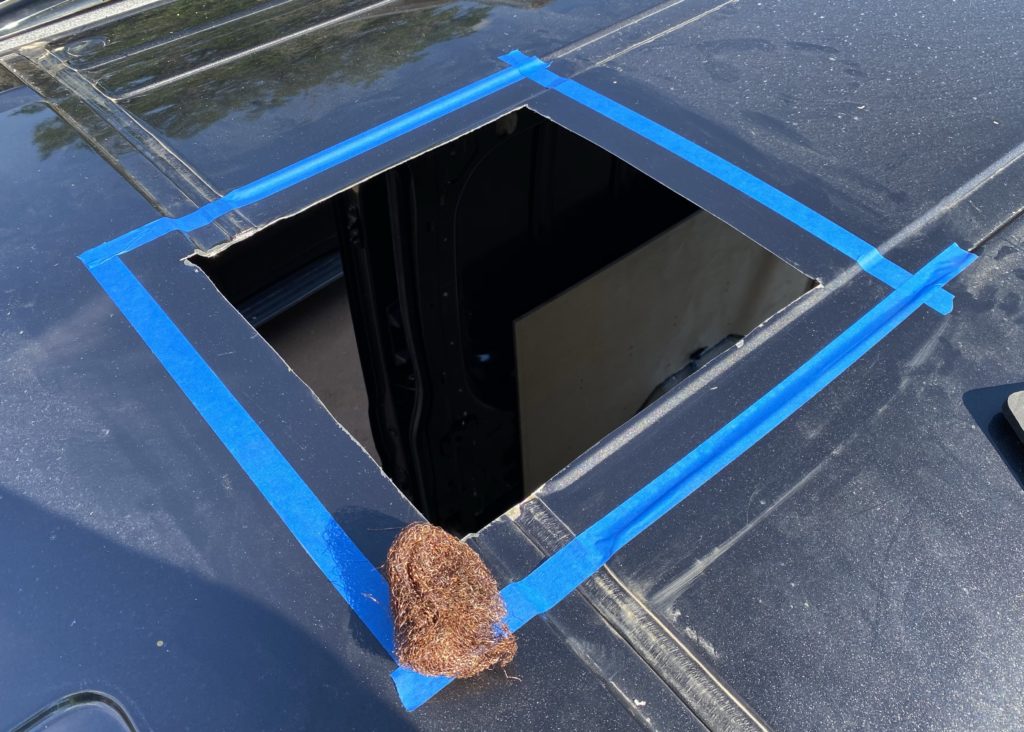
I failed to get a picture of the 3M Window Weld that I applied to the bottom of the adapter before clamping it onto the roof. I just ran three ~1/8″ beads around the adapter as the DIYvan instructions recommend. I used a bunch of trigger clamps to lightly hold the adapter in place, spreading out the force with some paint stir sticks. I didn’t crank down on the clamps, applying just enough force to flatten the beads of adhesive somewhat and ensure a solid seal. A little bit of Window Weld oozed out in some spots, so I used a rubber glove to make a filet around the adapter – I’m super confident that no water is going to seep in between the adapter and roof!
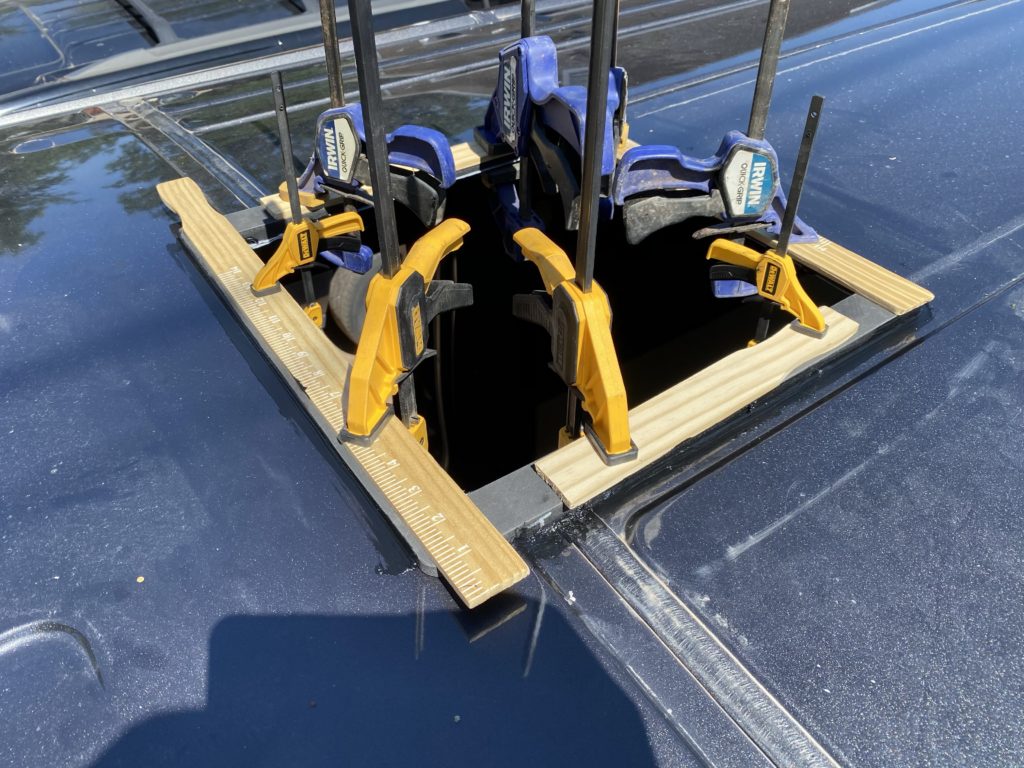
At this point, you might want to check the weather again. The adhesive has to cure over night before the fan can be installed. If there’s risk of rain, maybe plan to throw a tarp over the van while you wait.
Depending on where you are installing your fan, its weight (and added force in the wind) may be pushing down on unsupported sections of the thin metal roof. In the most forward section where I installed my fan, there is a 26″ span between the roof’s cross members. It seemed like that was a lot of flimsy metal trying to hold up the fan… I wanted to come up with a way to add additional support to the roof.
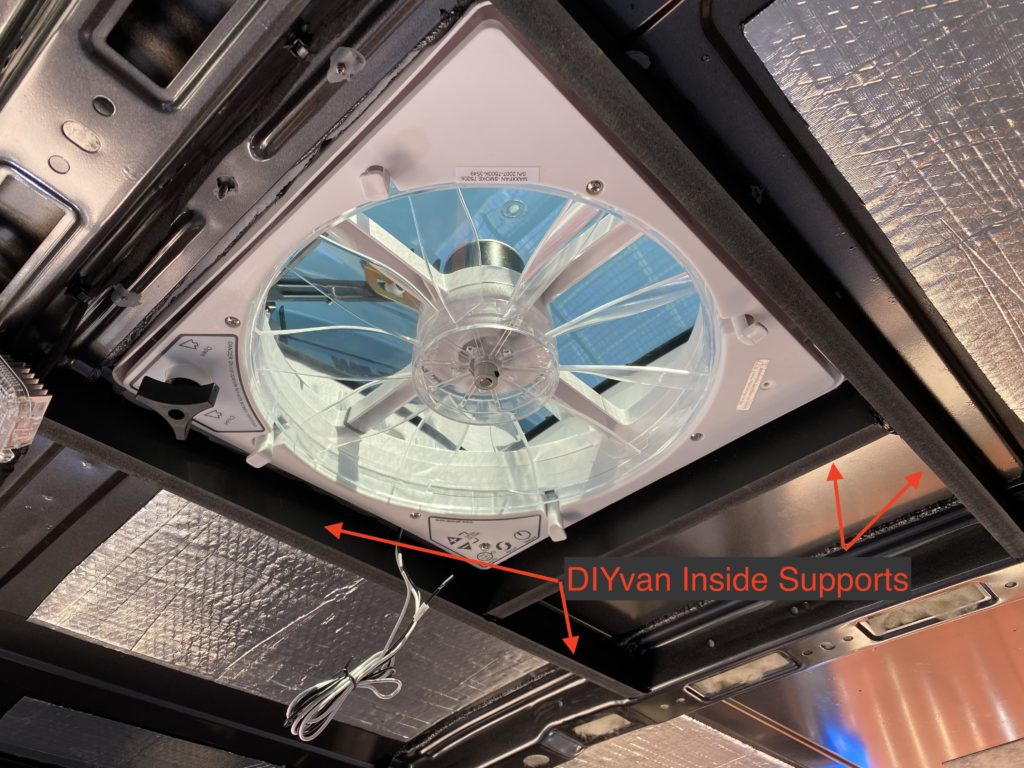
DIYvan has another brilliant product to address this concern – Interior Supporting Framing Strips. There are two long strips that fit the contours and bumps of the roof, and span between the cross members. Two shorter strips then attach in between those to securely frame out the fan opening. I ran two small beads of 3M Window Weld along the strips and then clamped them lightly to the roof. Once the adhesive cured, I was really happy with how much rigidity it added – I feel a lot better about my fan being supported by those! I’d say they’re worth it.
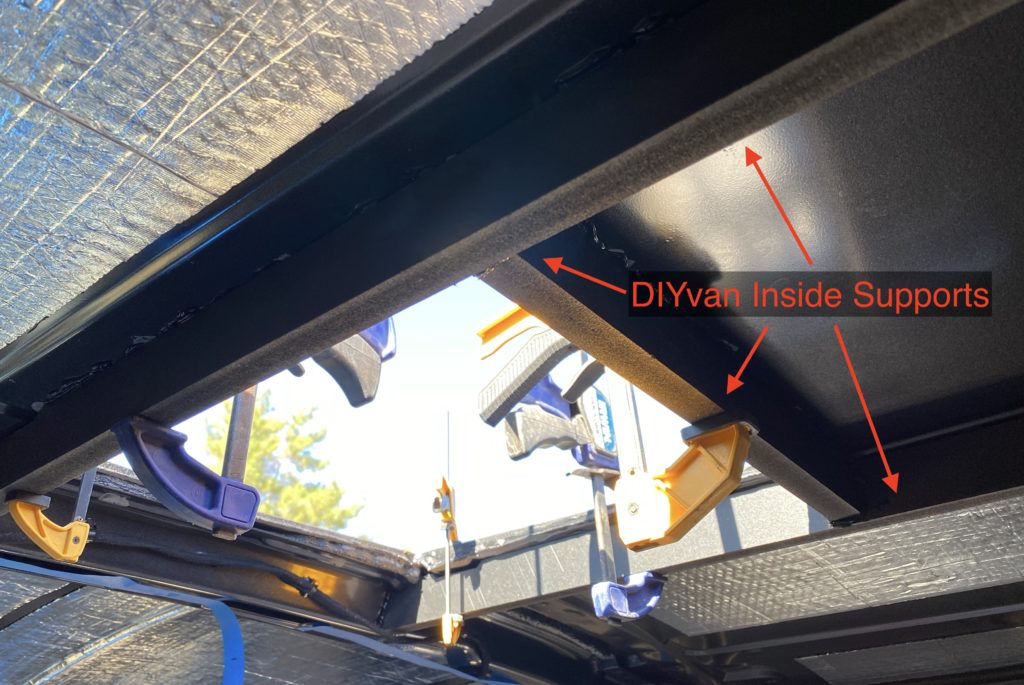
Come back tomorrow and we’ll finish installing the fan!
Oh, and by the way… have you installed Noico Sound Dampener on your ceiling to dampen the vibration and noise coming off the roof? While you wait for the 3M to cure, now might be a good time to check that task off your build list!
Step 4: Install Fan
With the adapter securely bonded to the roof, we need to drill some pilot holes for the 16 screws that are going to clamp the fan flange to the adapter and roof. I used one trigger clamp to make sure the fan flange didn’t move around on me.
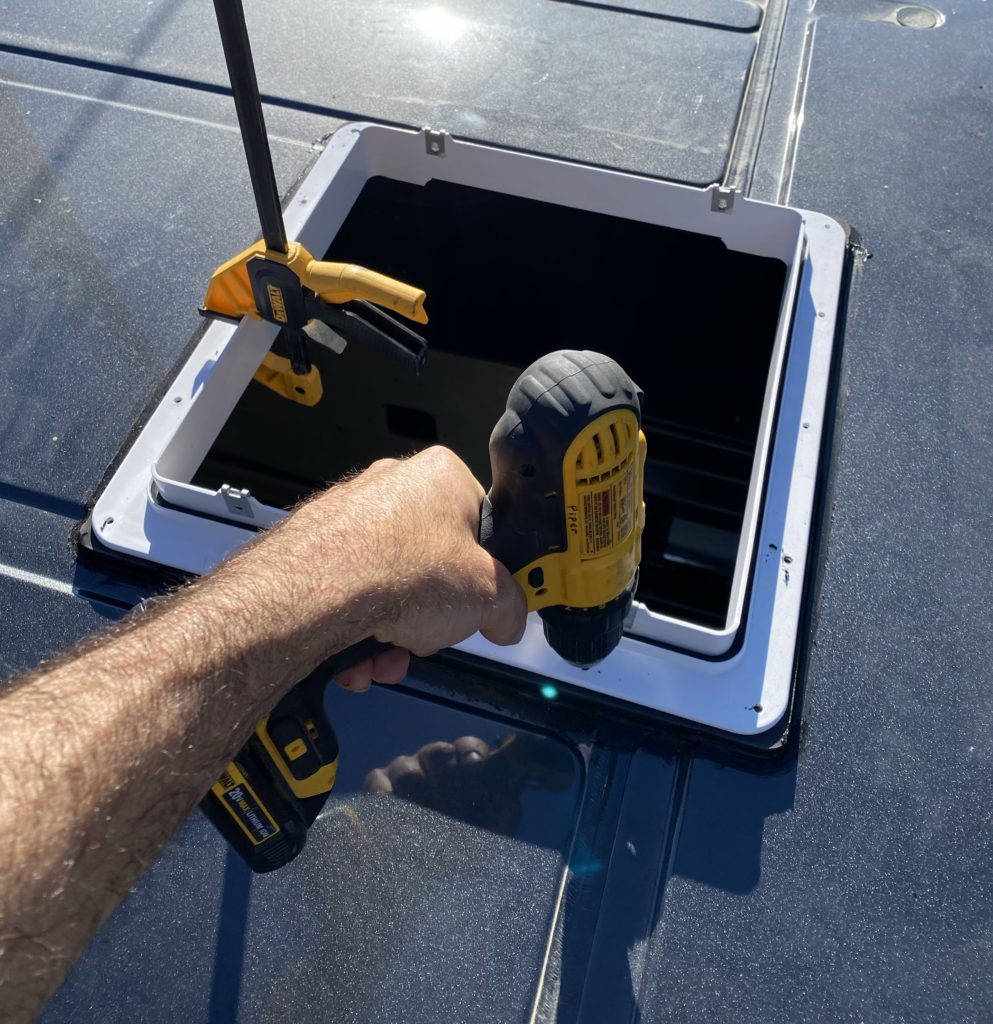
Hopefully when you ordered the adapter, you chose the option that includes the butyl tape. If not, you can get some here. Apply it to the bottom of the fan flange all the way around, making sure there are no gaps. It should be a solid gasket to prevent water from seeping between the adapter and fan! Once the tape is on, place the flange onto the adapter and screw it in place! Make sure to orient the flange so that the metal clips are on the sides of the fan.
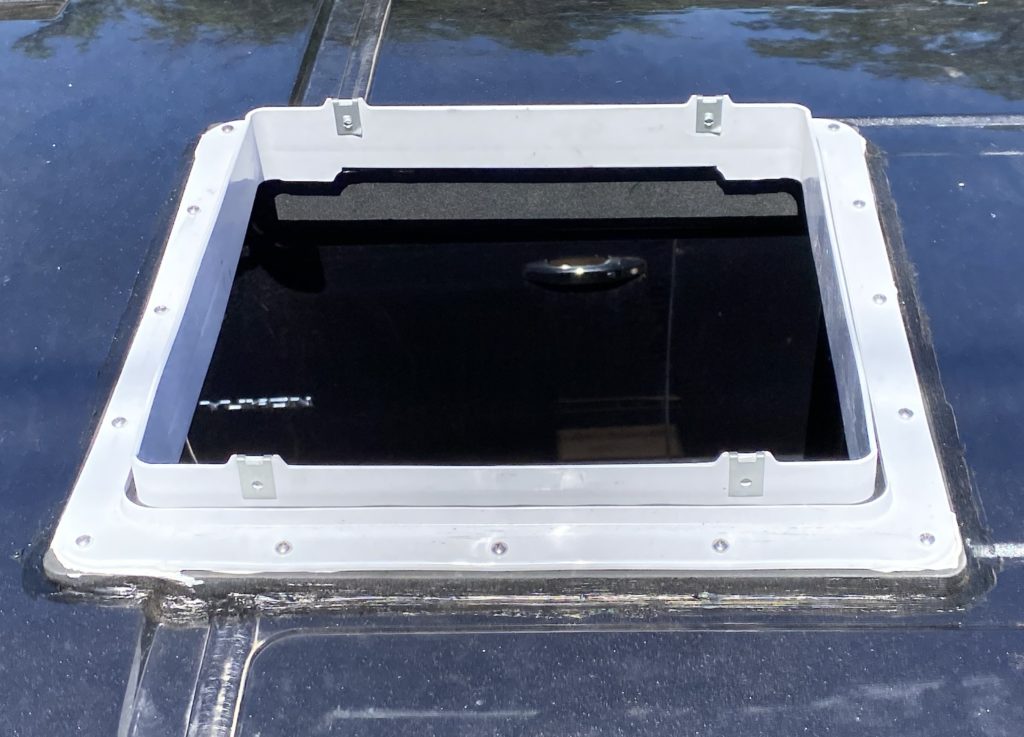
Because leaks suck, as a triple layer of protection, its recommended that you Dicor the heck out of the flange, including covering the screws completely. This stuff is pretty messy, but I guess it gets the job done.
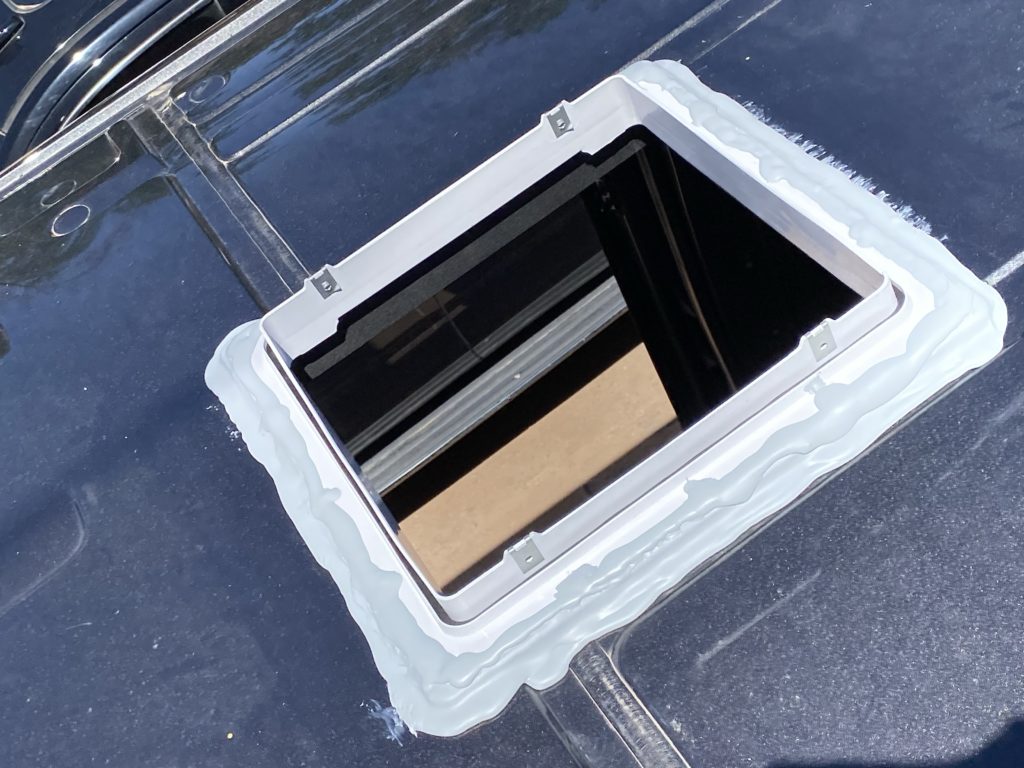
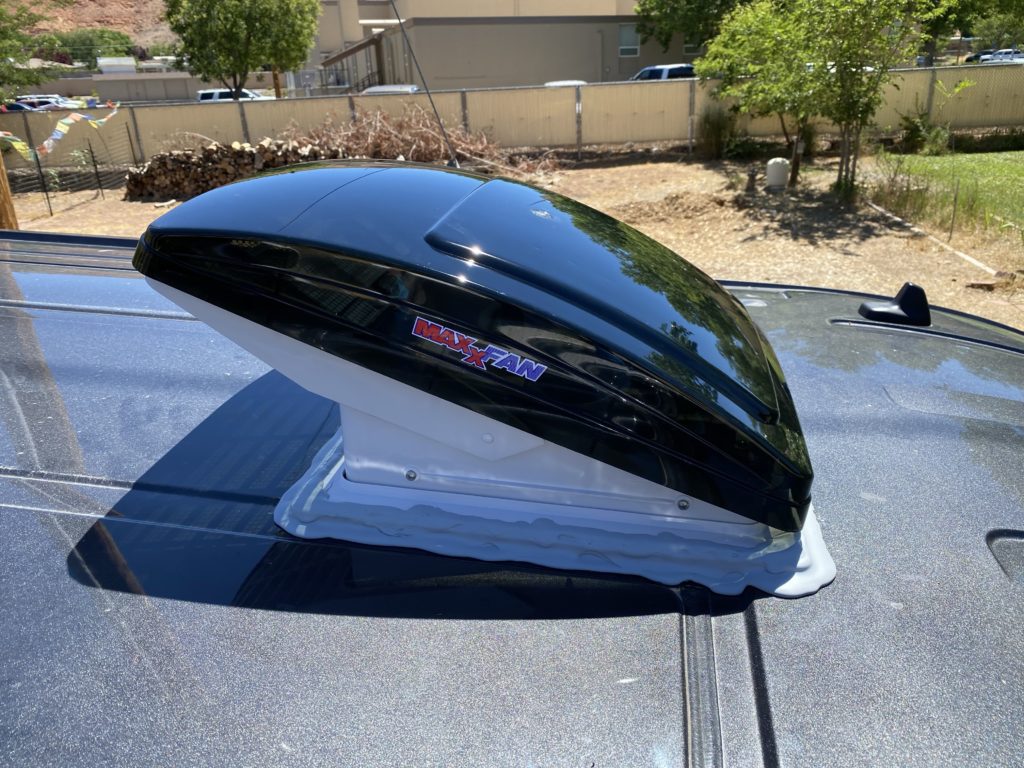
With all that hard work out of the way, the fan just sets onto the flange and is held in place with the four provided screws. You need to manually turn the black knob to raise the rain cover to access the screw holes.
Hop off the roof and check out how nice your fan looks from the inside too!
Celebrate, then remember that your shiny new fan is useless without power. We have more work to do!
Step 5: Wire Fan
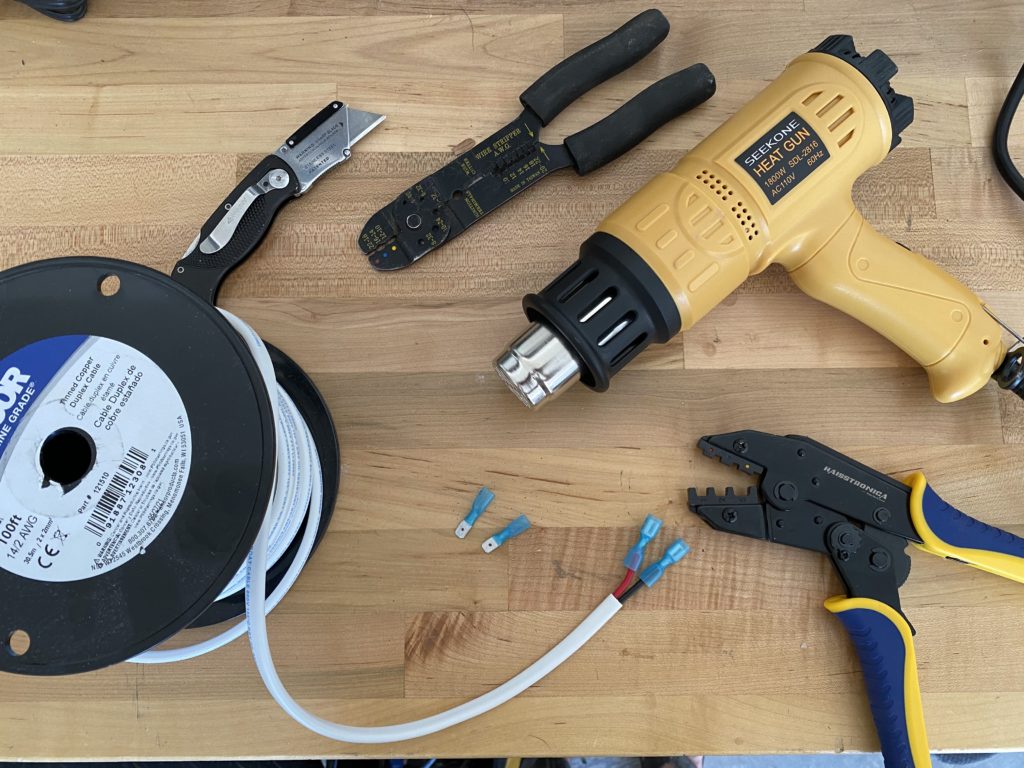
The MaxxFan ships with two standard crimp connectors, which I swapped out for higher quality, marine grade heat shrink crimp connectors. The main difference is that once the crimp is made, the heat shrink tubing gets melted down and adheres to the wire, making the connection more secure, less prone to failure, and more water resistant.
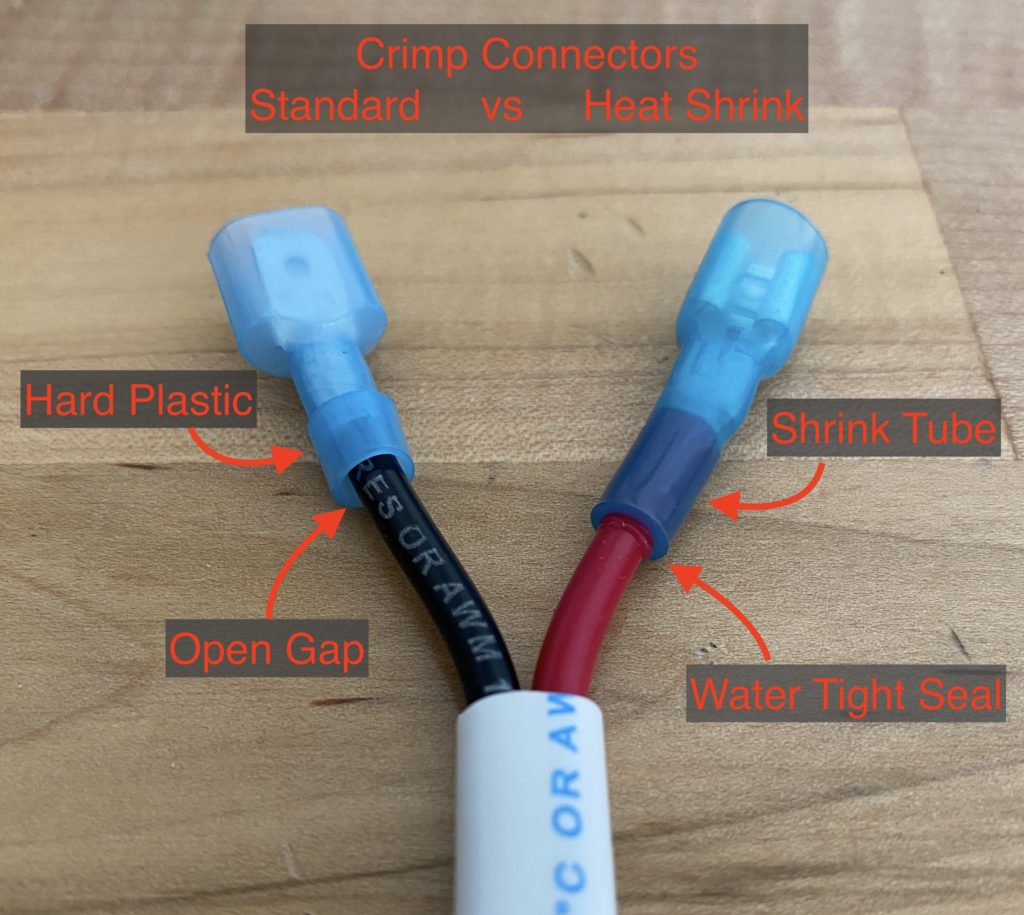
I tried using my generic wire crimpers at first, but for all the crimping I’m going to do in my build, I decided to upgrade to this Crimping Tool For Heat Shrink Connectors which made a world of difference. Its so quick and easy to use and the crimps come out perfect every time. A nice heat gun to melt the heat shrink tubing will also make the job go much smoother.
I ran the 14/2 marine duplex wire along the nearest roof rib over to the passenger side, then back along the ceiling to where it will drop down to a Blue Sea Systems Fuse Block and the rest of my power system.
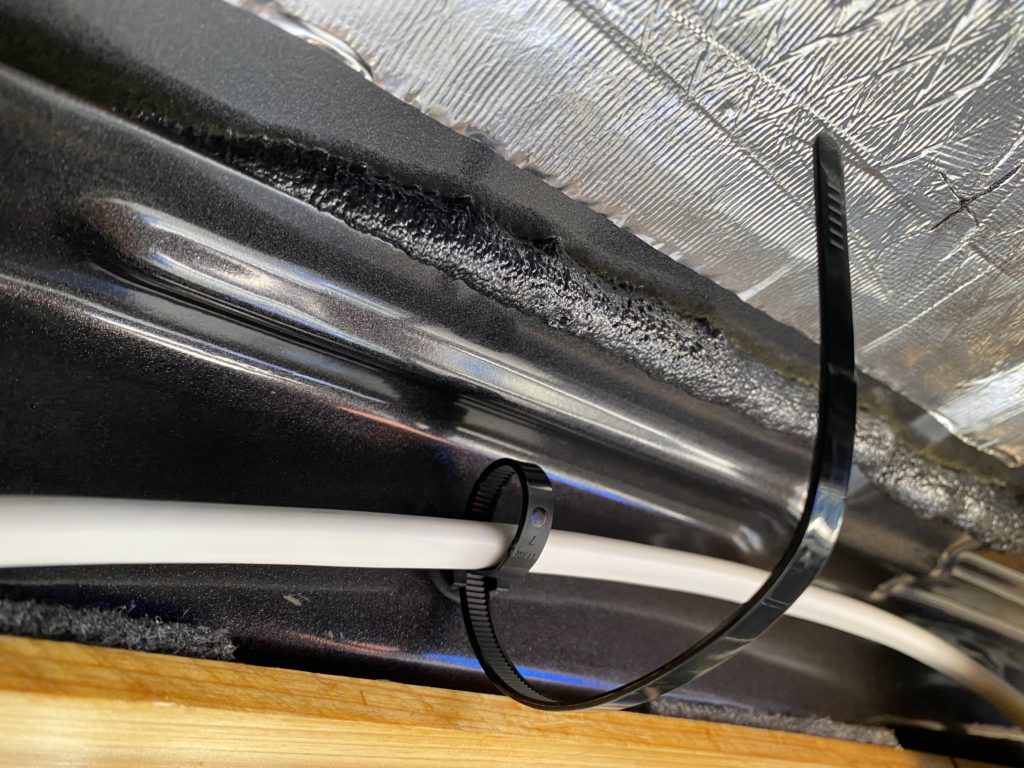
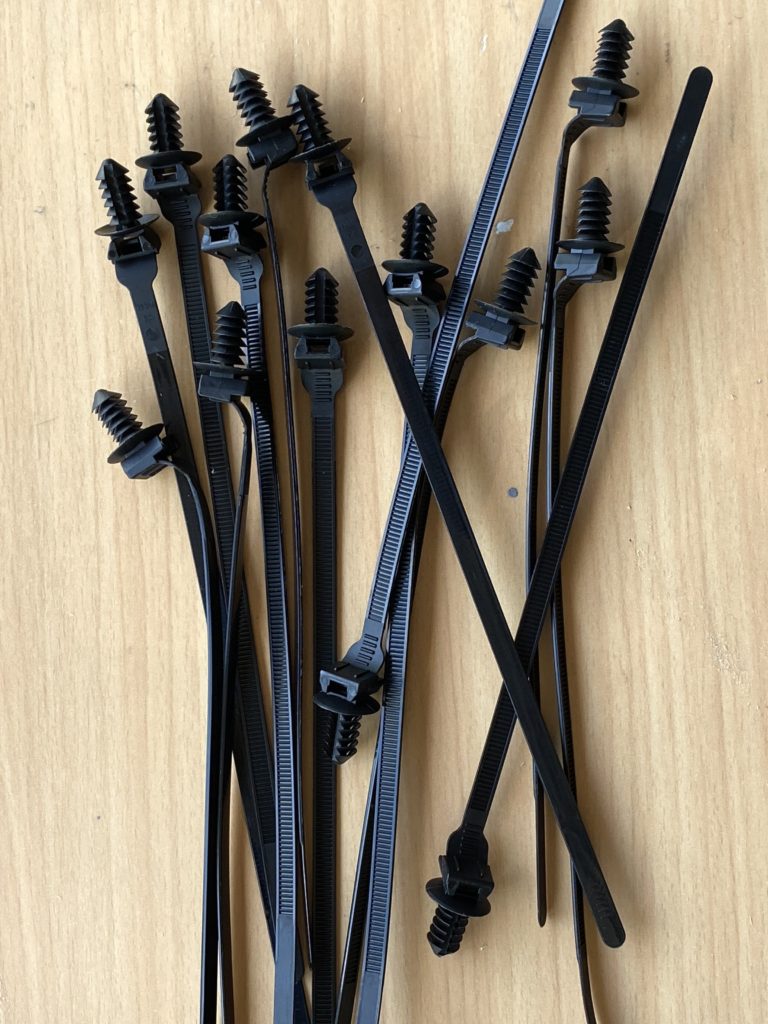
Pretty sweet way to attach the wires to the ceiling ribs, eh? I was able to track down those christmas tree looking push mount zip ties that Ford used to secure the dome light wires along the ceiling ribs. I am so stoked I found these, I’m going to be using them elsewhere in my build to secure wires to other factory holes!
The heat shrink quick disconnects I used seemed to be quite secure, I don’t think there was much risk of them rattling apart, but I wrapped some electrical tape around them to be sure the connection remained secure.
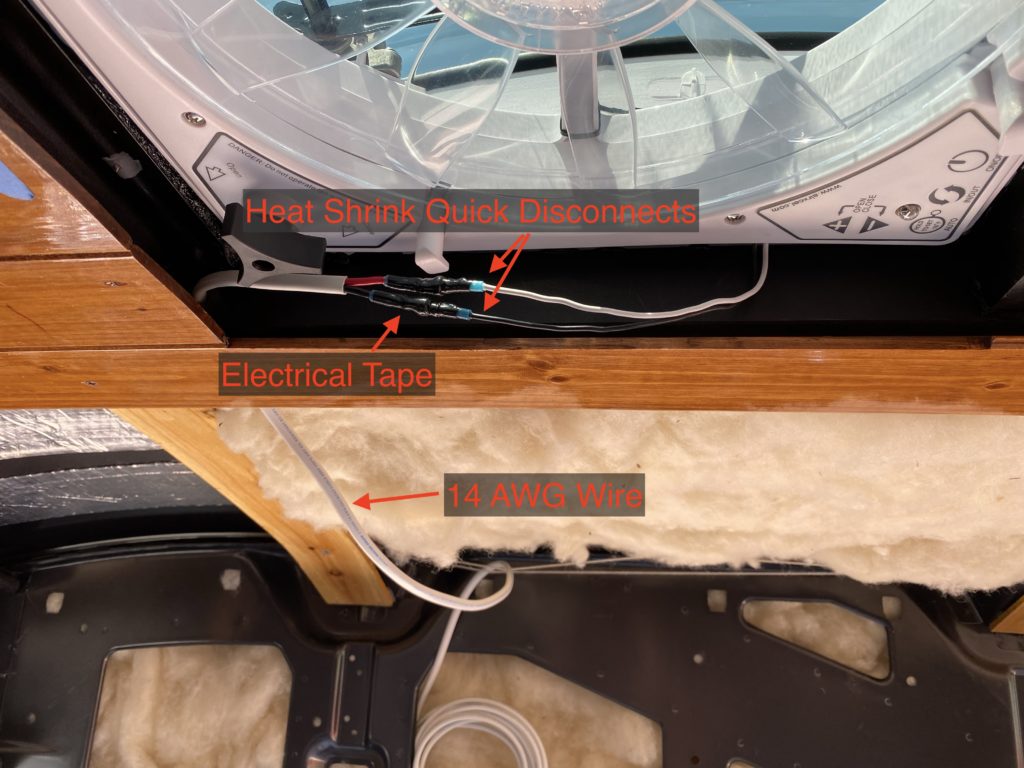
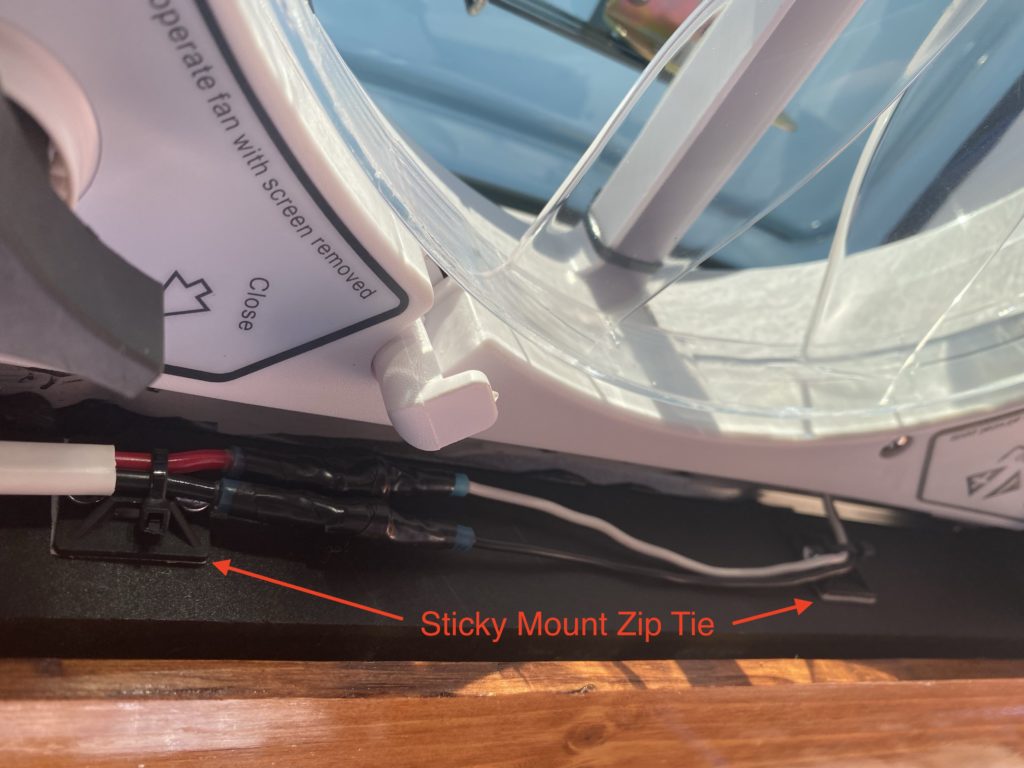
I use a couple of sticky zip tie mounts to secure the wires to the DIYvan inside support they run along. I also ran a few small screws through the holes in the mounts, just in case that sticky stuff doesn’t last long, I don’t want wires clanking around up there.
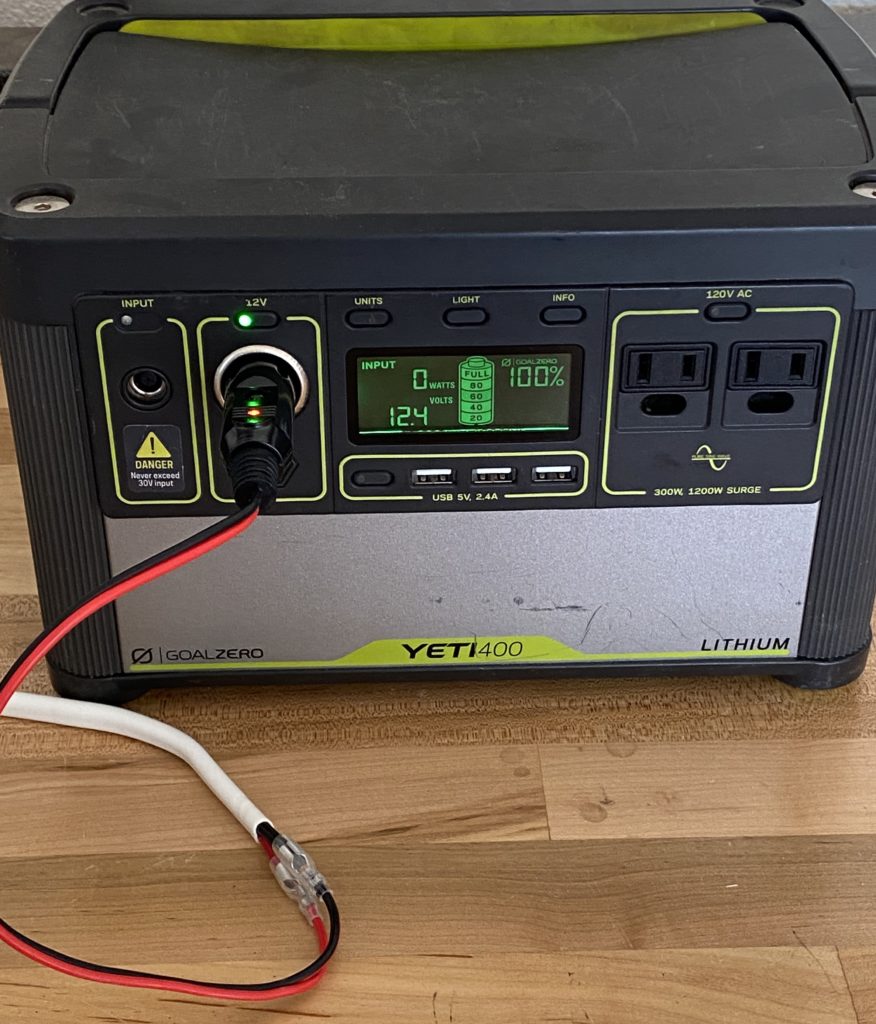
I haven’t built out my house electrical system yet, and it may be a little while until I do. In the meantime, I wanted a way to test the fan! I picked up a cigarette lighter adapter with leads and connected it to my GoalZero Yeti 400. I’m happy to report the fan works and I have a temporary power solution until I do my full electrical build out.
Step 6: Install Custom Trim
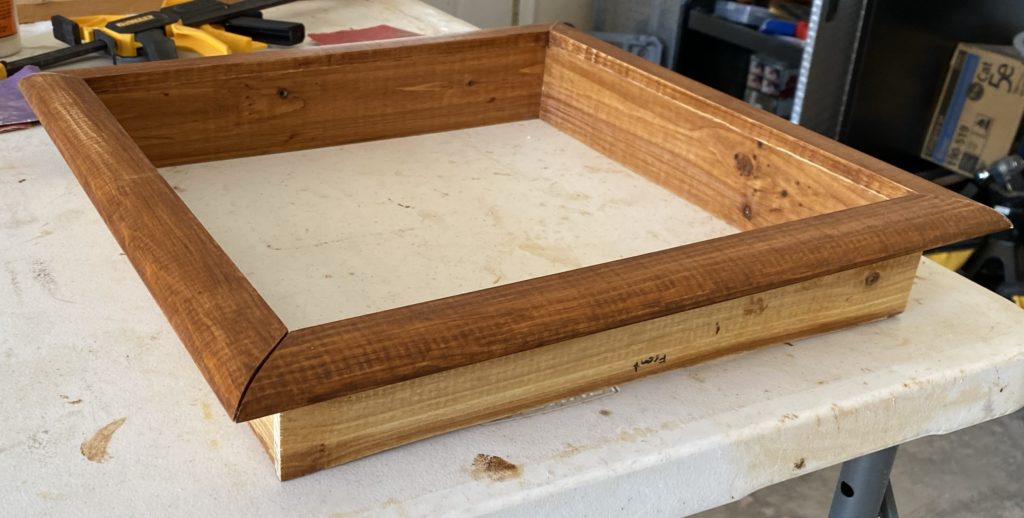
The MaxxFan comes with a sad generic white housing… but I envisioned something a bit nicer than that, so I built a custom trim piece that blends into my hand stained tongue and groove ceiling. It looks amazing! It was also a lot of work… but totally worth it!
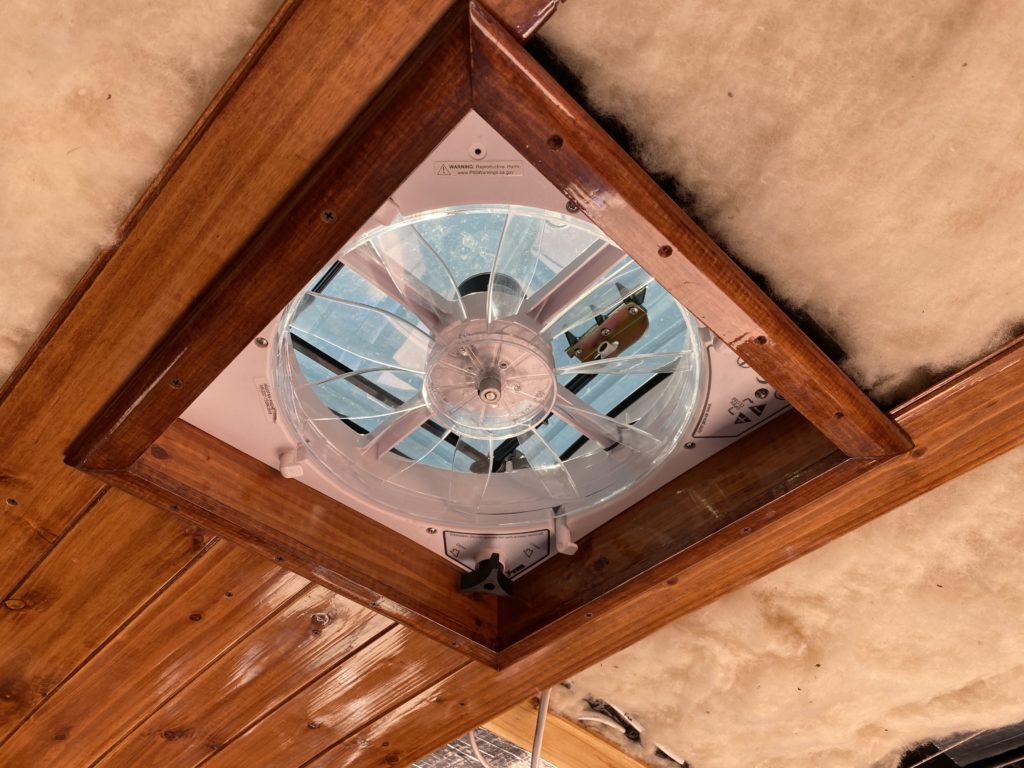
I spent a couple of days figuring out how to make the square box and attach the edge molding to it. My first attempt was a good learning experience, but I had to remake it a second time to perfect the design. I used the same 1/4″ Tongue & Groove planks I’m installing in my ceiling to frame out the fan box. The first time my measurements were off, the box wasn’t perfectly square, and worse… it ended up too small to fit around the white fan frame. Time for a do-over!
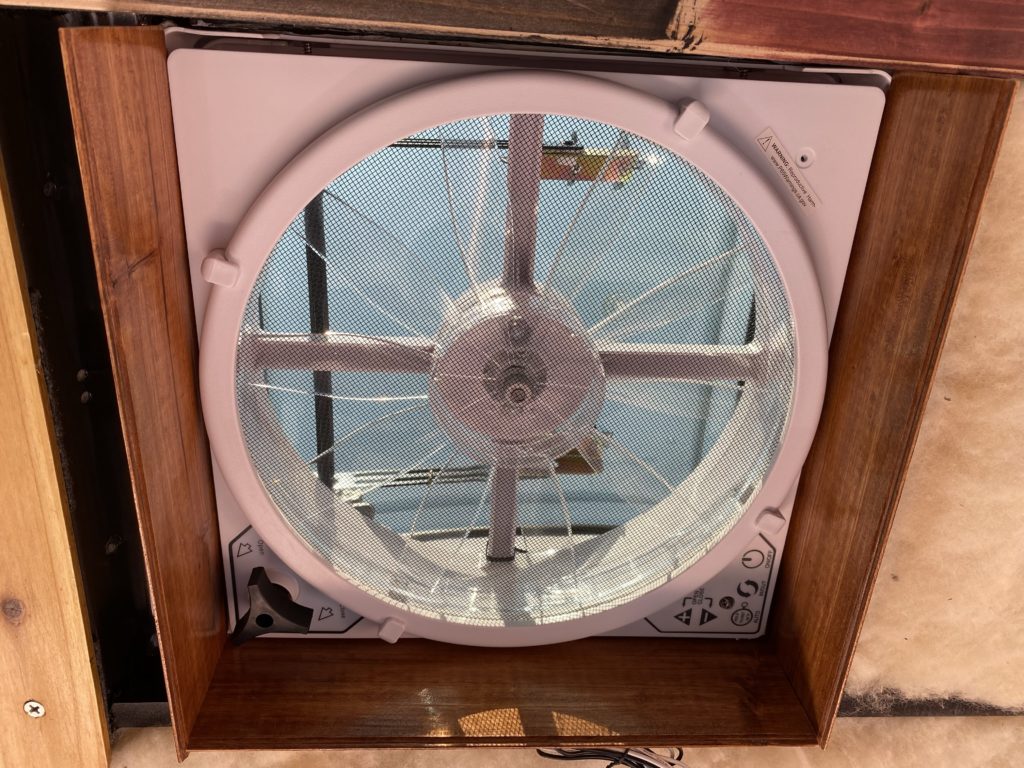
Once I re-measured and re-cut the sides of the box, I used blue painters tape to hold the square together and rigged up a system of trigger clamps and scrap wood to hold the box in place while I marked cut lines onto it so that it would lay flush with the ceiling.
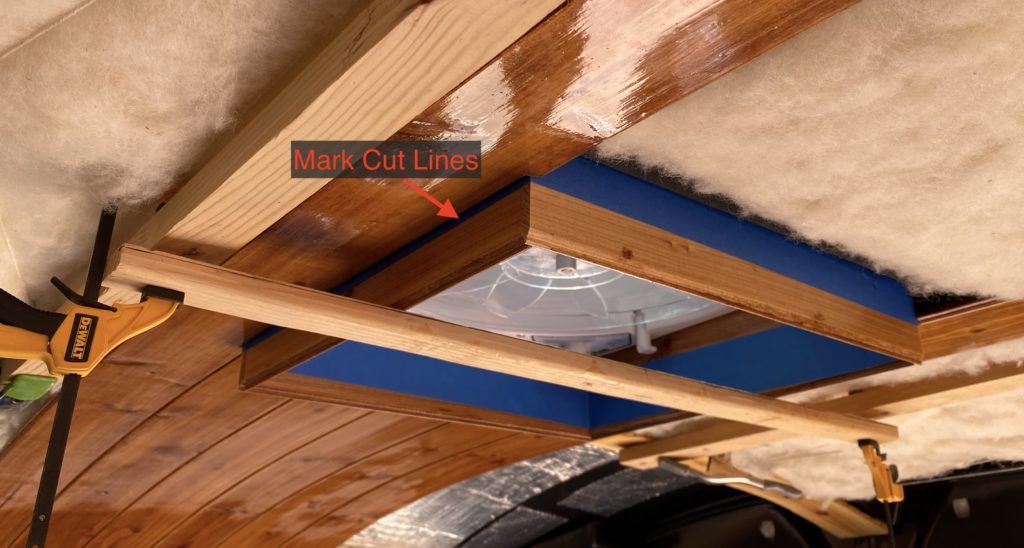
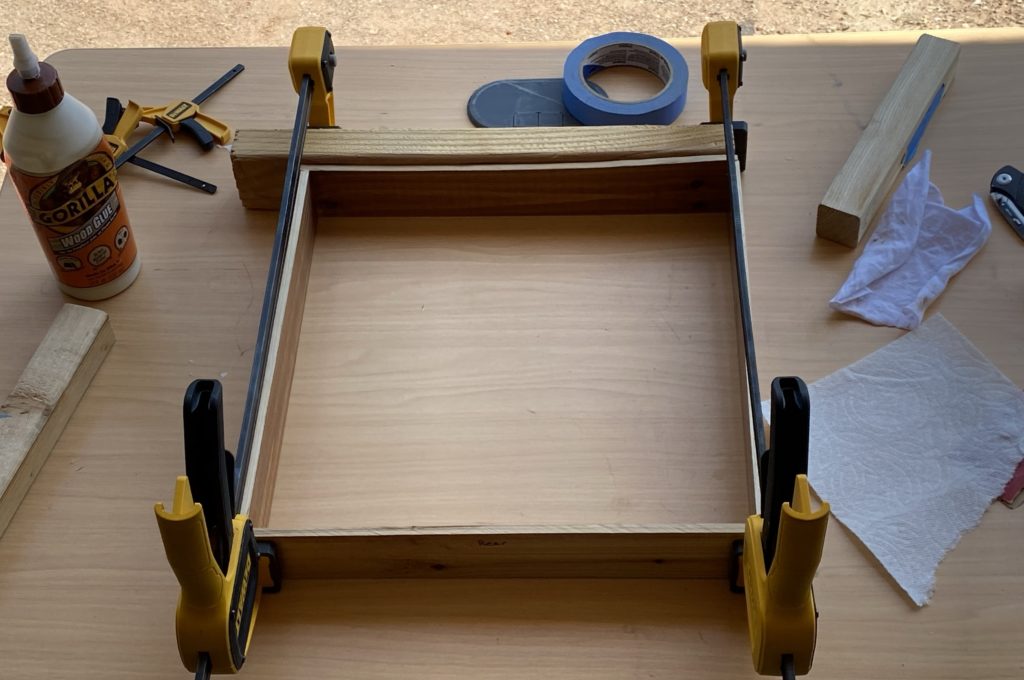
Once I cut off the excess, I applied wood glue to the edges that mate and clamped the box together. Another lesson I learned on my first attempt was that the wood glue didn’t adhere well to the polyurethane sealer that had already been applied to the wood, so this time I used sand paper to roughen up just where the joints are, and the pieces bonded much better.
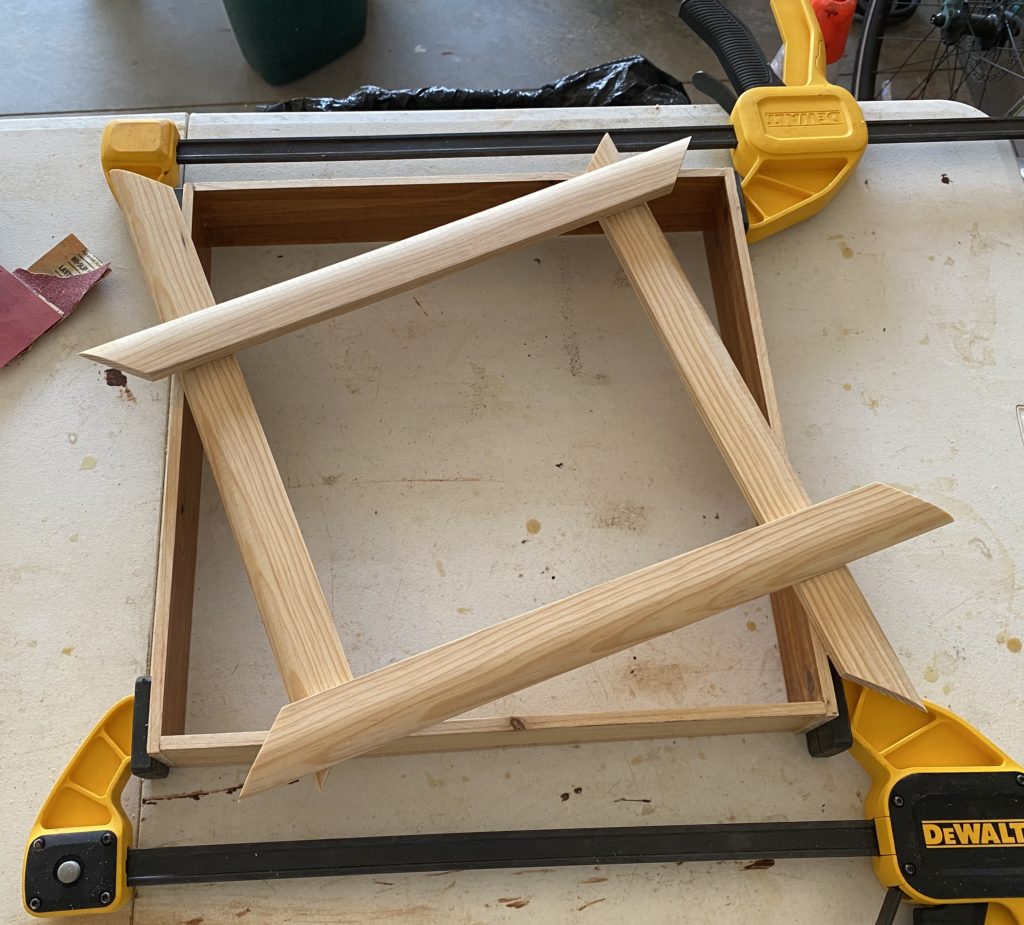
I picked up some pine molding at the local hardware store. It came in a 7′ piece and was labeled “Ranch Door Stop”. I used my miter saw to cut 45 degree angles so that where they join in the corners looked nice.
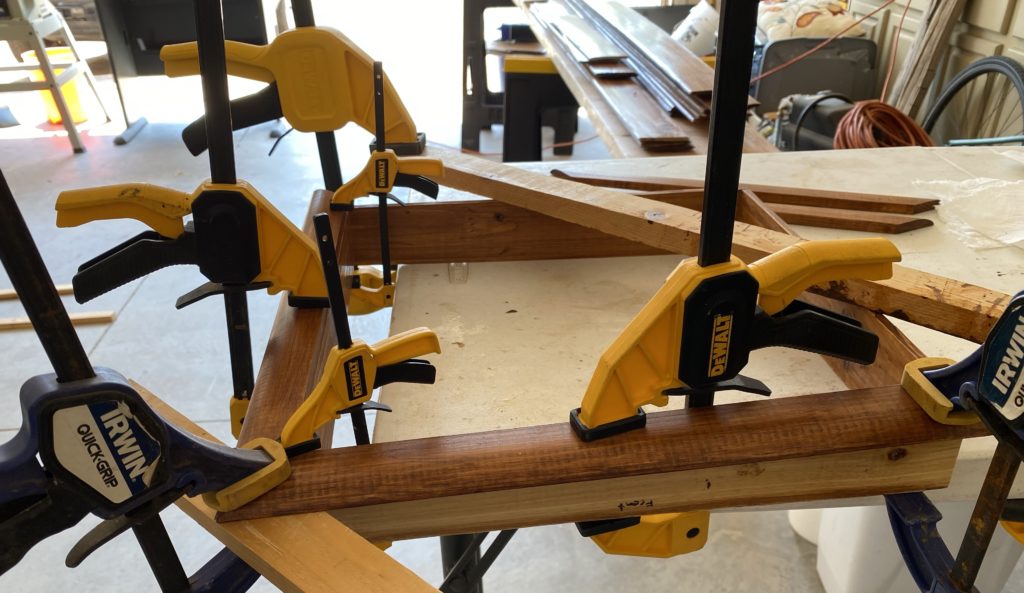
Then using a ton of trigger clamps, I glued the molding to the fan box. I stained the molding before I attached it, but waited to coat it with polyurethane sealer until after it was constructed.
Despite my best effort to cut the molding exactly the right size and attach it precisely so there were no gaps at the joints, they ended up being a tiny bit off. I used a dab of wood filler to fill the seams, and you can hardly notice after it was stained and sealed!
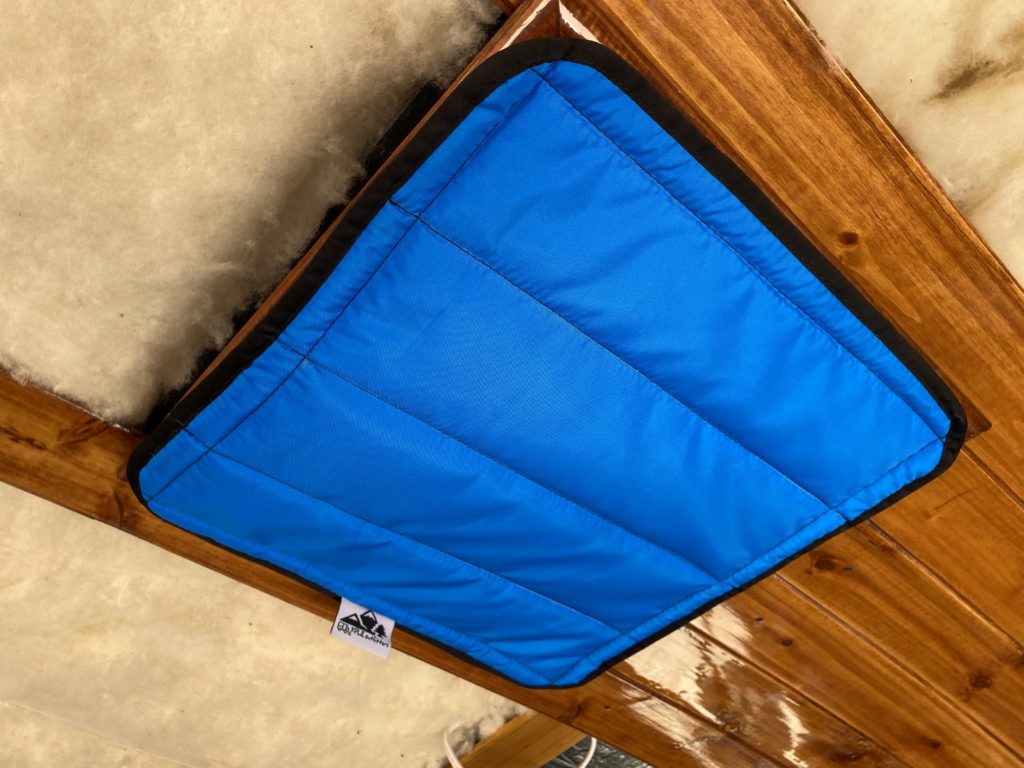
Before installing the fan trim box, I want to give a shout-out to Paul @ xplroutfitters.com! His custom window and fan covers are amazing, you should definitely check them out! I got this beautiful blue fan cover from him that has integrated magnets so you have the option of sticking it to the ceiling.
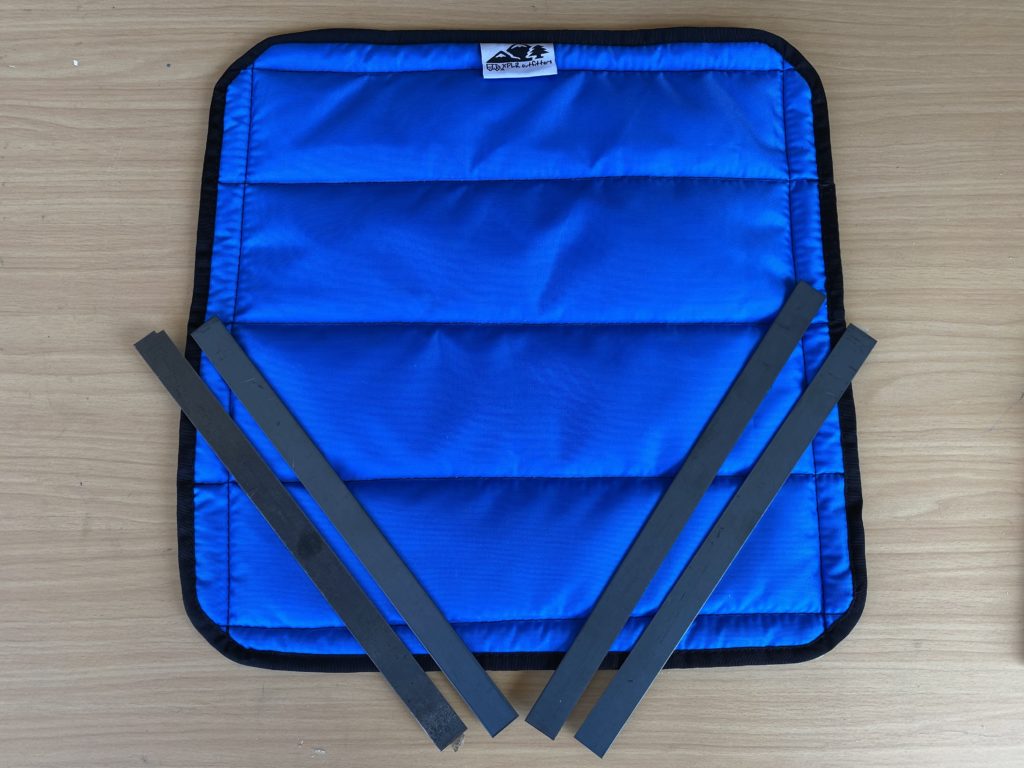
He ships four thin metal strips with each fan cover that usually would get hidden behind the white plastic trim that comes with the fan and allows the magnets stitched into the cover to stick to the ceiling. I needed a different solution for my custom trim, and luckily, I discovered that the 3/4″ screws I was using to install my ceiling stuck to the magnets quite well. I decided to install the trim piece with twelve slightly longer 1″ screws that lined up with the twelve magnets in the cover. It works brilliantly!
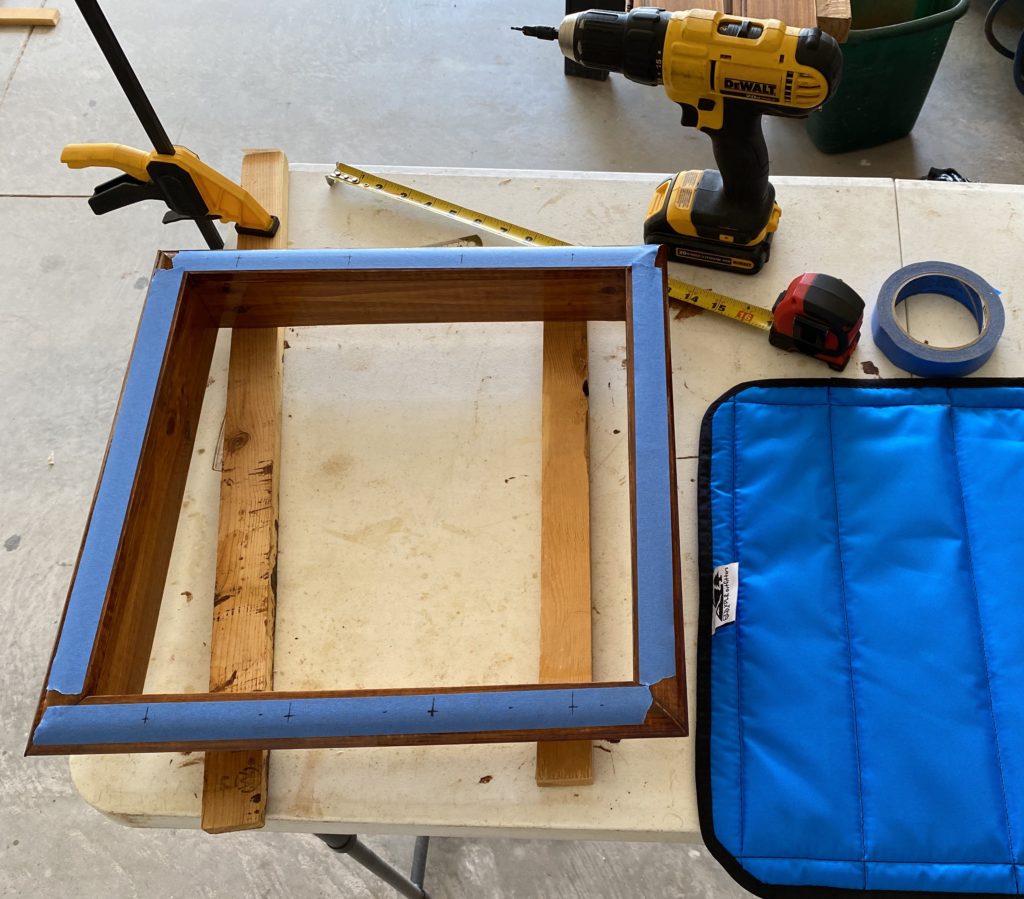
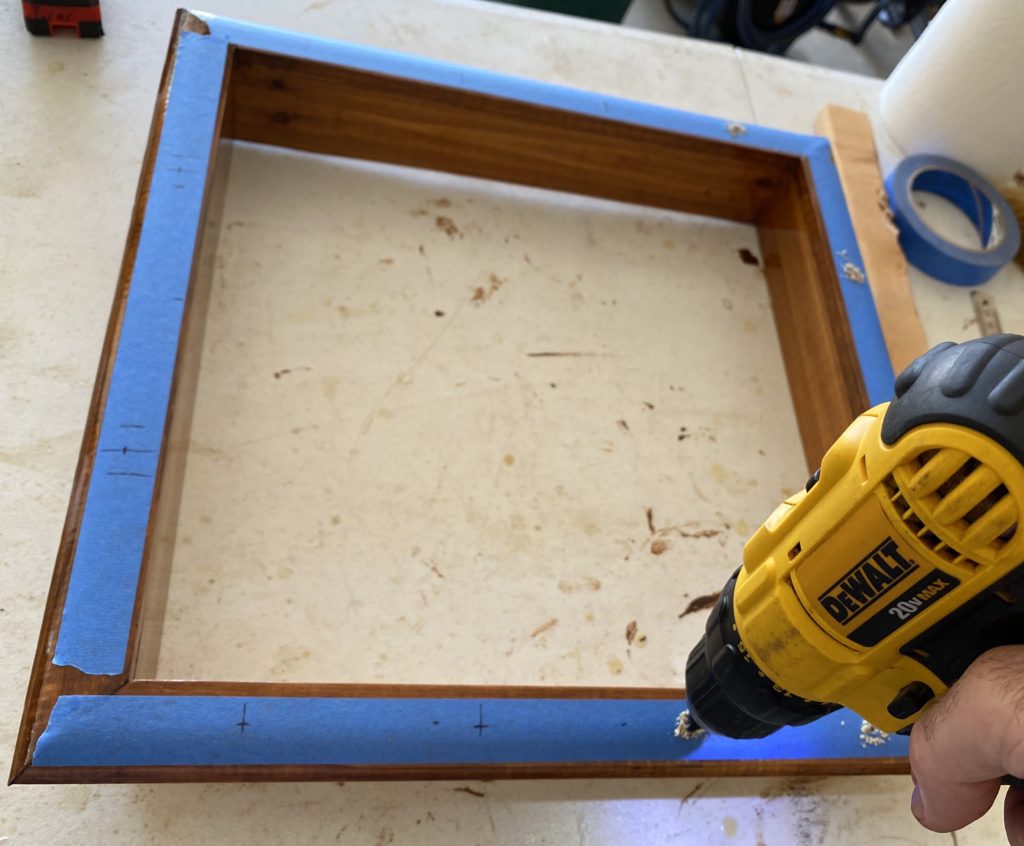
The fan cover is stitched into four rows that match almost exactly the four Tongue and Groove ceiling planks that will run along the ceiling before and after the fan. Within the edge border of those rows are magnets that can move side to side a little bit. I measured out and marked onto blue painters tape where the midpoints of the four ceiling planks would be and then used a countersink drill bit to allow the screws to recess into the trim and lay flush. I did the same thing with the two magnets in each of the side borders as well. Once the holes were where I wanted them to be, I wiggled the magnets to line up with the screws.
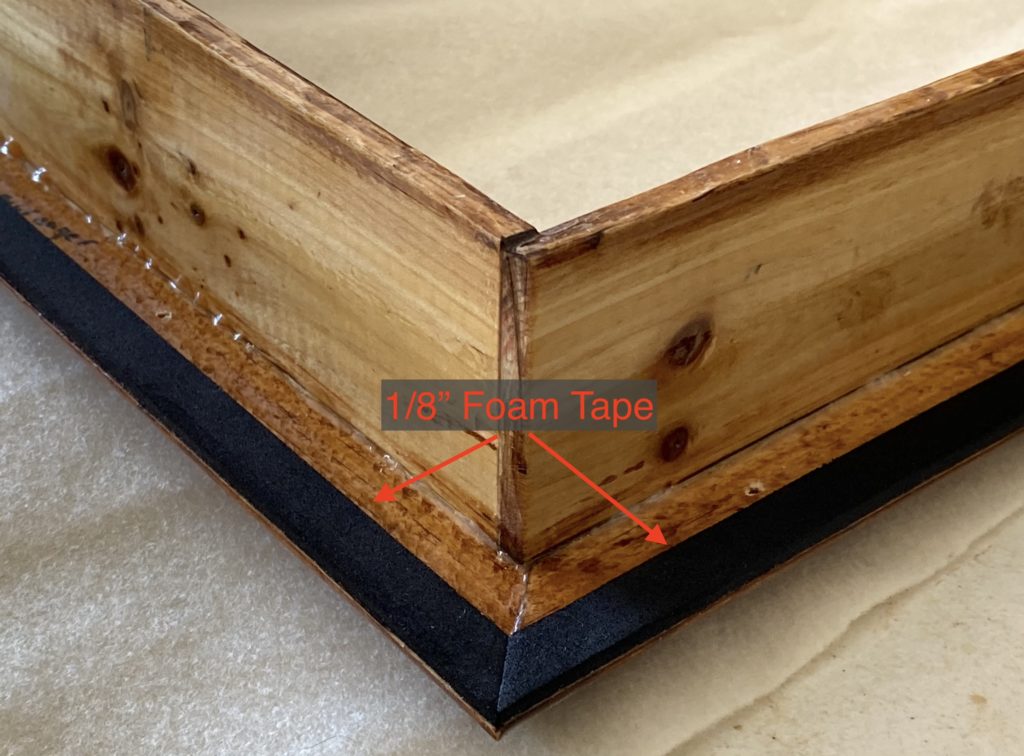
I outlined the lip of the trim piece with 1/8″ x 1/2″ Foam Tape. Without it, there were uneven gaps between the trim piece and T&G ceiling planks and I was also worried about possible noises from the planks rattling against the trim piece on bumpy roads. I’m not sure that its a totally necessary step, but I feel better having it there just in case.
At this point, the custom fan housing just needs to be screwed into place. And, once thats done, the fan cover can be tested out! Woohoo! It sticks to the ceiling. The magnets are strong enough to keep it suspended on the ceiling even when getting tossed around on bumpy roads. I’m super happy with how it turned out.
Thanks for sticking with me through the entire install and enjoy the cool breezes from your awesome new fan!
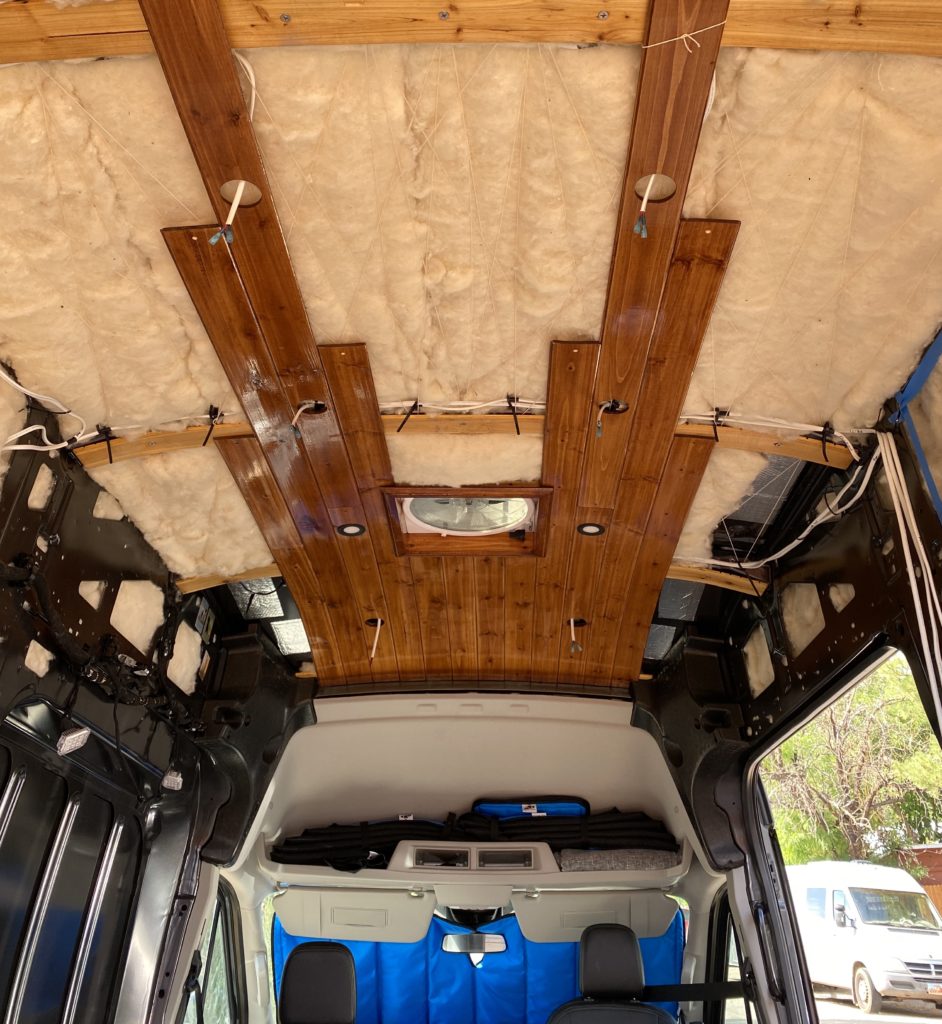
Heres a sneak peak at the rest of my ceiling install progress. I’ll post a full write up when it’s complete. I’m installing Havelock Wool above the hand stained T&G Planks and wiring in some Black Acegoo Recessed LED Lights. Its looking stunning already, I can’t wait to show off the finished product.
Don’t forget to follow us on Instagram: @MauiTheVan
Other posts you may be interested in:
- Ford Transit Slider Door Window Install
- Ceiling Install – Coming soon!
Hey Matt, this is one of the best fan installs Iv’e seen. I have a 2016 Transit with a Rhino Rack crossbar on the 2nd and 3rd mount. Do you think the lid would hit the crossbar if I mounted it in the same location as you?
Thanks Todd! So I am not familiar with those cross bars beyond a quick google search to get a rough idea what you might be talking about. I think the best I can do is show you from above how much clearance there is and let you decide whether you think it will fit. I snapped a few shots from my drone looking straight down on the fan. I drew red lines where I think your bars would be mounted. Unfortunately, I returned the tall ladder I borrowed to install the fan, so I cant get back up there to measure how much space there is between the fan and the midline of the mount. Does looking at these pics help any?
awesome set up, any recent issue with wind or being too upfront? if so, anyway to avoid it, thanks!
No issues with wind or anything, and I’m happy with where it’s installed.